For those of you who work with websites frequently, CMS-specific issues like database connection issues and the white screen of death are pretty typical. But, you’ll most likely encounter an additional set of issues related to your DNS and internet connection.
When attempting to access a website, users of Google Chrome frequently encounter DNS_PROBE_FINISHED_NXDOMAIN along with the error “This site cannot be reached – Server IP address could not be found”. It can be rather annoying to suddenly be unable to access your website or any other website at all. 😫
Don’t fear if you run into this problem when attempting to visit your website—there is an easy fix. Take a look at the reconnection advice provided below. This might also function with other browsers, including Edge, Firefox, and so on.
What Is DNS_PROBE_FINISHED_NXDOMAIN?
DNS misconfiguration or other problems are the most frequent cause of DNS_PROBE_FINISHED_NXDOMAIN. In order to help direct traffic on the internet, the Domain Name System, or DNS, connects domain names to actual web servers. Essentially, it transforms a request that is human-friendly, such as kinsta.com, into a computer-friendly server IP address, such as 216.3.128.12.
When a user enters a URL into their web browser, DNS starts working, creating a link between the URL and the IP address of the actual server. A DNS precursor contacts numerous nameservers during this procedure, which is referred to as DNS name resolution, in order to ascertain a server’s actual IP address.
If DNS cannot resolve the domain name or address, the DNS_PROBE_FINISHED_NXDOMAIN error may occur. NXDOMAIN is the acronym for Non-Existent Domain. Find out more about how DNS works.
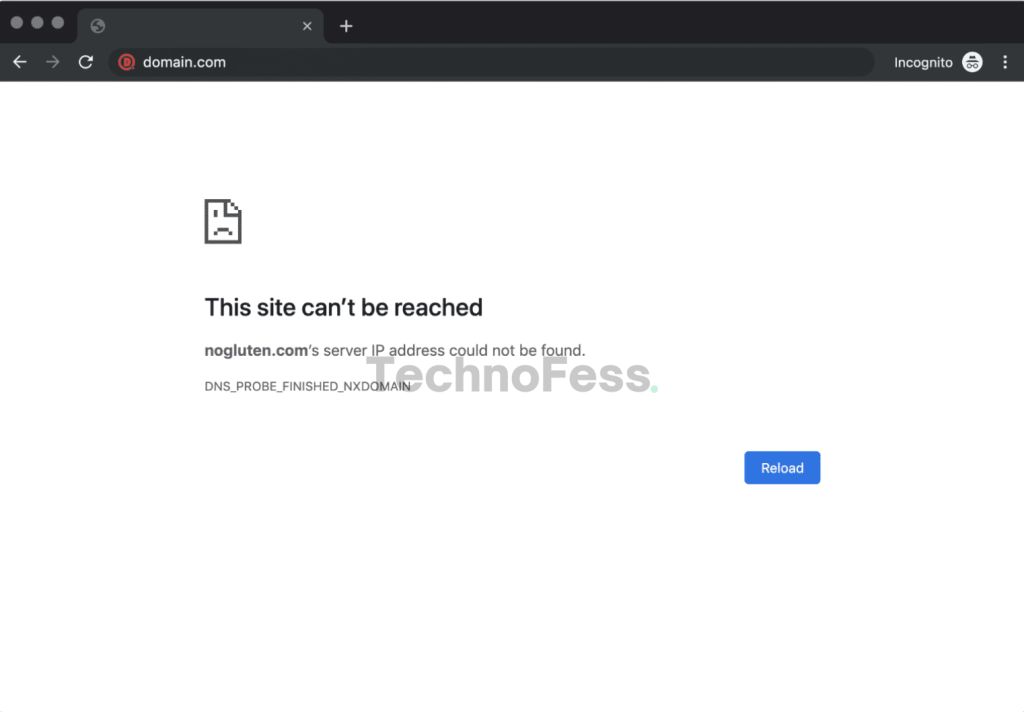
DNS PROBE FINISHED NXDOMAIN error
When your DNS cannot resolve the domain name or IP address, an error known as DNS_PROBE_FINISHED_NXDOMAIN displays, it happens when there is a DNS connection gap between domain names and actual web servers. NXDOMAIN is the acronym for Non-Existent Domain.
What Does the Browser’s DNS_PROBE_FINISHED_NXDOMAIN Error Look Like?
Depending on whatever browser you are using, this error can appear in a few different ways.
Google Chrome
The error message in Google Chrome indicates that the server IP address could not be located, along with the message DNS_PROBE_FINISHED_NXDOMAIN (as shown below), indicating that the website is unavailable.
Mozilla Firefox
In Mozilla Firefox it will simply show as Hmm. We’re having trouble finding that site (as seen below).

The main reasons for the DNS_PROBE_FINISHED_NXDOMAIN Error
As mentioned before, this error arises when the Domain Name System cannot translate a website’s URL into an IP address. Among the potential causes of this are:
- You typed the website’s name into the search bar erroneously.
- There is an issue with your internet connection that is preventing you from accessing.
- Your firewall is preventing you from accessing the webpage.
- An antivirus program or a VPN is interfering with your network setup.
- The domain appears to be either unregistered or expired.
- Your DNS settings are not being used appropriately.
- Fixing DNS_PROBE_FINISHED_NXDOMAIN on a Desktop
How to Fix DNS PROBE FINISHED NXDOMAIN
The recommendations and items to check out that follow (organized by the most common causes we see) ought to assist you in correcting the error:
- Release and Renew IP Address
- Restart DNS Client Service
- Change DNS Servers
- Reset Chrome Flags
- Disable VPN and Antivirus Temporarily
- Check Your Local Hosts File
- Check DNS of Your Domain
- Restart Your Computer
Release and Update IP Address
The first thing you should do is release and renew your computer’s IP address because this is typically a client-side DNS issue. Flushing your local DNS cache, which is comparable to browser cache, is also part of this.
Windows
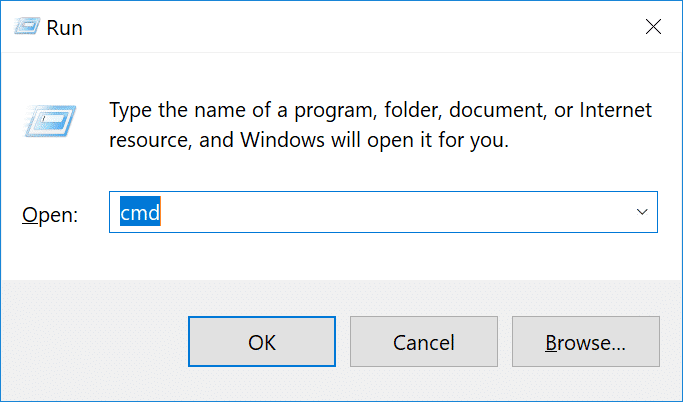
To access the Command Prompt on Windows, press the Windows logo key and R. Next, type “cmd” and press Enter.

Type in ipconfig /release and hit Enter. This will release your current IP address.

Then type in ipconfig /flushdns and hit Enter. This will flush your local DNS cache. You should see a “Successfully flushed the DNS resolver Cache” if it worked.
Then type in ipconfig /renew and hit Enter. This will renew your IP address.
You might also try resetting your IP settings and Winsock catalog with the following commands: netsh int ip set dns and netsh winsock reset.
An alternative way to flush and renew your DNS is simply by disabling your network adapter and re-enabling it.
Mac
To release and renew your IP address on a Mac, go to System Preferences…
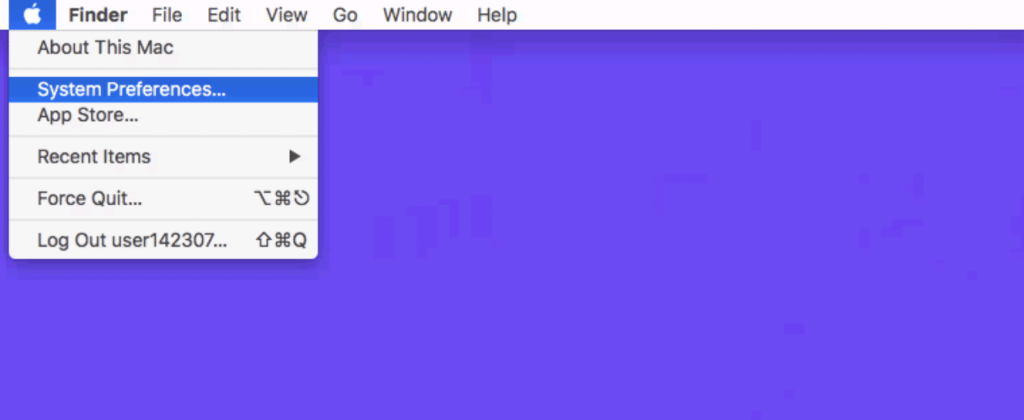
Click on the network icon and then click “Advanced.”
Click the TCP/IP tab heading if you aren’t already in there. Then click on the “Renew DHCP” lease button.
Just like we did above in Windows, Mac users can also clear their local DNS cache. Although this is done in a different place. Go to Utilities and then click on “Terminal.”
Enter in the following command:
dscacheutil -flushcacheRestart DNS Client Service
Restarting the DNS client services, which resolve and cache DNS domain names, is an option if you’re using Windows.
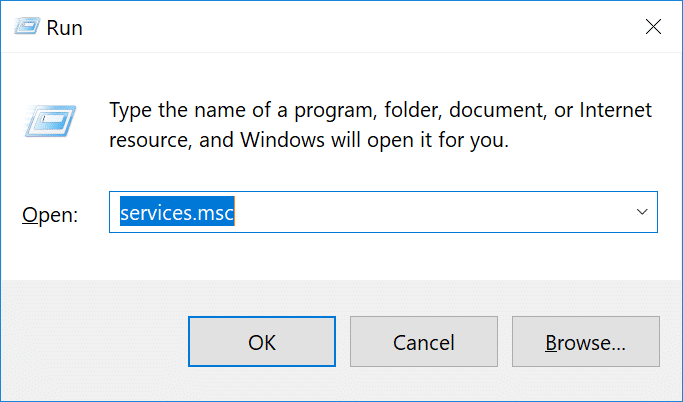
All you have to do is hit the Windows logo key and R to launch Command Prompt. Next, enter “services.msc” and press Enter.
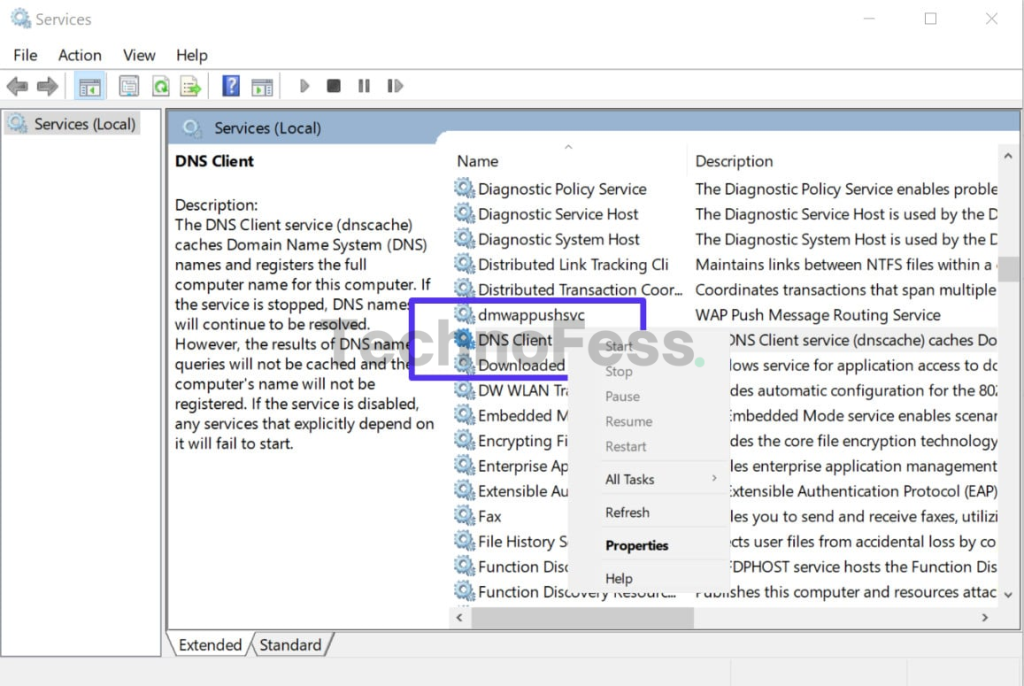
Scroll down to “DNS Client,” right click on it, and select “Restart.”
You can still restart using the command prompt if, like us, you are unable to choose the restart option.
Press the Windows logo key and R together to open Command Prompt. After that, type “cmd” and hit Enter.
Then enter the following commands:
net stop dnscache
net start dnscache
Depending on the version of Windows you’re running you might get an error saying:
This is probably because in order to issue the command, CMD needs to be executed as a network service. We advise trying the other options below first if you’re seeing this problem.
Change DNS Servers
Changing your DNS servers is the next thing you can attempt. By default, your ISP assigns DNS servers automatically. However, you might attempt to momentarily switch these to a publicly accessible DNS server, like Google or Cloudflare.
Long-term users of Google’s public DNS (8.8.8.8 and 8.8.4.4) may choose to utilize them because they are occasionally more dependable.
We’ll be using Cloudflare’s newly released, extremely fast and secure free DNS addresses, 1.1.1.1 and 1.0.0.1, in this example. The procedure is the same if you wish to use Google’s; you just swap out the DNS server addresses for Google’s.
Advice: If you’re having problems with a free DNS server you’re already using, you can try uninstalling it and going back to your ISP’s DNS servers. Because neither Google nor Cloudflare are flawless all the time, there have been a few occasions where we’ve found that going back has fixed the problem.
Windows
- To access the Command Prompt on Windows, simply press the Windows logo key and R. Next, key in “control panel” and press Enter.
- Click on “Network and Internet” and then “Network and Sharing Center.” On the left-hand side, click on “Change Adapter Settings.”
- Right click on your current connection, this will either be Local Area Connection or Wireless Network Connection based on how you’re connecting. Then click on “Properties.”
- Select Internet Protocol Version 4 (or IPv6 if desired) and click on “Properties.”
- Make a note of any existing settings in case you need to revert back. Click “Use the following DNS server addresses.” Enter the following, or replace the existing with these:
For IPv4: 1.1.1.1 and 1.0.0.1
For IPv6: 2606:4700:4700::1111 and 2606:4700:4700::1001
Mac
- To change DNS servers on a Mac, go to System Preferences…
- Click on the network icon and then click “Advanced.”
- Click on the “DNS” tab.
- Then add Cloudflare’s DNS server addresses.
For IPv4: 1.1.1.1 and 1.0.0.1
For IPv6: 2606:4700:4700::1111 and 2606:4700:4700::1001
Reset Chrome Flags
It is possible for experimental features or Chrome settings to be inadvertently altered or corrupted. By typing chrome://flags into your browser and selecting “Reset all to default,” you can return these to their original settings.
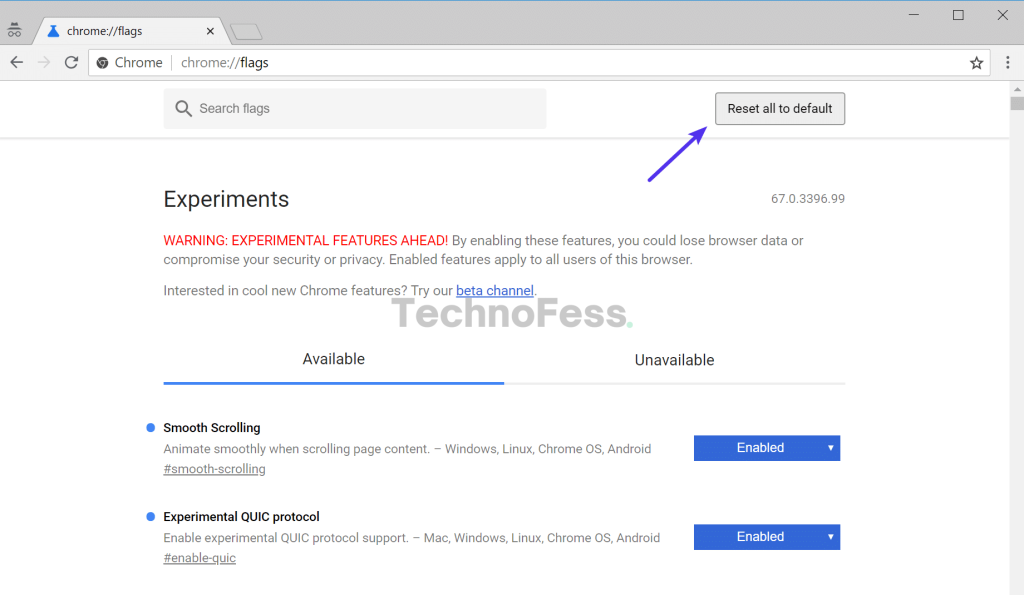
Reset Chrome flags
Then restart your browser.
Turn off your antivirus and VPN temporarily.
VPNs and antivirus programs may occasionally clash with one another or overrule your network configurations, including DNS servers, etc. Try temporarily removing (closing) any that are currently active to see if it fixes the DNS probe ended nxdomain error in Chrome.
Examine the hosts file locally.
There is a file on every computer known as a local hosts file. This file has manually entered DNS entries that are mapped to particular IP addresses. This is usually only changed in order to preview your DNS before moving domains to a new server.
That being said, there are a plethora of methods in which this file could have been altered. It is therefore worthwhile to check your local hosts file again to make sure the website you are trying to access isn’t listed there if none of the aforementioned solutions worked for you.
Windows
More access is usually needed to the hosts file. Hence, launch your text editor as an administrator as the initial step. All you have to do is navigate to your text editor from the Start menu, right-click on it, and choose “Run as administrator.” Any text editor, like Notepad, Notepad++, Atom, etc., can be used for this. In the example below, Sublime is being used.
- Run text editor as administrator
Within your text editor click File → Open and browse to the following location:
C:\Windows\System32\drivers\etc\- Click on the hosts file and “Open.”
- Open hosts file
- Double check and make sure the website you’re trying to visit isn’t listed in there. If it is, remove it.
Mac
We advise getting Gas Mask if you want to check your hosts file on a Mac. This is a free program that may be used to manage and transition between hosts files and editors. Everything is made quick and simple by it! If not, you can manually edit your hosts file on a Mac by following the instructions below.
Navigate to Utilities and select “Terminal.”
Enter in the following command and press Enter (you will most likely be prompted for your administrator password as well).
sudo nano /private/etc/hostsDouble check and make sure the website you’re trying to visit isn’t listed in your hosts file. If it is, remove it.
Verify Your Domain’s DNS
Even after reviewing your hosts file, if the DNS PROBE FINISHED NXDOMAIN issue is limited to a single domain, you may need to verify the DNS configuration on the domain name itself.
We have a detailed guide explaining how to point your domain and/or DNS to Kinsta if you are a Kinsta client. It’s possible that your computer’s DNS cache had inaccurate information if you just moved your website to a different hosting company. Whichever the case, that should have been rectified by Step 2 above.
Restart your computer.
It might annoy you, but it needs to be dealt with. 😬 If none of the above fixes work, try restarting both your router and your computer. We realize that many of you probably have hundreds of tabs or apps open, so this is the last option. On the other hand, a device’s temporary cache is truly cleared out when it is rebooted.
Fix DNS_PROBE_FINISHED_NXDOMAIN for iOS & Android Mobile Devices
The most popular methods for resolving this issue on your mobile device are as follows:
- Turn Off Your Device
- Look for updates for the Chrome app.
- Clear the cache and application data in Chrome and look for system updates.
- Modify the Network Settings on Your Mobile Device
Turn Off Your Device
You are probably familiar with the well-known tech support query, “Have you tried turning it off and back on again?”
The saying is well-known for a reason, though: Rebooting usually solves the issue! Perform a basic device restart first, then try any of the other fixes on this list.
Read also: How to Fix Google Chrome’s “ERR_CACHE_MISS” Error
Look for updates for the Chrome app.
Next, check sure your Android smartphone is running the most recent version of the Google Chrome software.
The procedures listed below can be used to check for and install any available Chrome updates:
- Launch the App Store app (for Android devices, this is called Google Play Store).
- On the upper right corner (in the search bar), tap your profile symbol.
- Click the menu item labeled “Manage apps and device.”
- Click or tap Updates available.
- Search the list for Google Chrome. Press the Update button adjacent to it if you see it.
- Relaunch the Chrome app when the update has finished installing to determine if the error is still occurring. Proceed to the following solution if you are.
Unambiguous The Browser and App Data Caches in Chrome are helpful since they make browsing faster. As evidenced by our studies, Edge Caching actually cuts the time it takes to send complete pages to browsers by over 50%.
However, problems such as DNS_PROBE_FINISHED_NXDOMAIN can also often be traced back to this cached data.
Clear the cache and application data in Chrome and look for system updates.
Fortunately, this cached data is unnecessary, and removing it could resolve the issue.
With a few touches, you can remove the Chrome cache and app data from your mobile device:
- Launch the Chrome application.
- Press either the top or bottom hamburger menu icon (⋮ or ⋯).
- Select History > Delete browsing history.
- Examine your browsing history as well as any cached files or photos. Don’t check any of the other options.
- If you get a notice asking you to “Also clear data from these sites?” confirm by selecting Clear.
- When Chrome has finished deleting all of the data, tap the OK, got it confirmed message.
- Try accessing the page once more to check if the issue has disappeared. Don’t give up if it hasn’t! Simply select the following option from below.